
Layer shifting is the quickest way to turn a crisp print into a frustrating mess—because it means the printer moved in the wrong place at some point. The good news: on most FDM machines, it’s not random. It’s usually a specific mechanical or motion-control issue you can track down.
This guide walks you through diagnosing the likely root cause (belts, tension/idlers, loose set screws, binding, and stepper-related problems) and verifying the fix with test prints so you don’t guess twice.
Read the symptom and narrow the cause

- Shift starts at a specific height: Often linked to a component that changes conditions as the print grows—cable strain, belt tension under load, or a contact point becoming relevant.
- Shift is consistent in one direction (X or Y more than Z): Points to motion on that axis—typically belt/pulley alignment, set screws, idlers, or mechanical resistance.
- Shift looks like a “jump,” not a gradual misalignment: Usually position loss—like a pulley slipping, a set screw slipping on a motor shaft, or the drive train binding and skipping steps.
- Shift happens early and repeats often: More likely wiring/power/stepper settings, or something immediately wrong with the drive train.
If you can, note the axis (X, Y, or Z), the approximate layer height, and whether the printer seems to hesitate, click, or lose smooth movement right before the shift.
Troubleshoot systematically (belt, tension, set screws, binding, steppers)
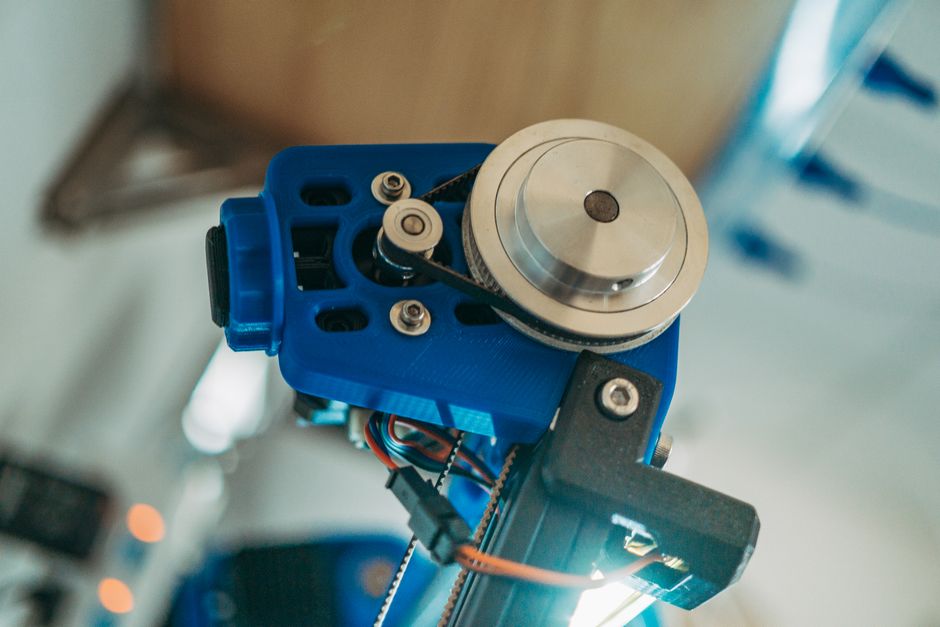
- Check belt condition and tension: Look for frayed belts, missing teeth on pulleys, or a belt that’s too slack (easy to skip) or too tight (can increase resistance). Re-seat the belt on pulleys so it tracks smoothly.
- Inspect idlers and pulley alignment: Make sure idler wheels spin freely, are not wobbling, and keep the belt aligned. Confirm pulleys are mounted straight and belts are not rubbing on housings or frame edges.
- Verify set screws and pulley/motor connections: With power off, check the set screws on drive pulleys and ensure the pulley hubs are fully seated on the motor shafts. A pulley that slips even slightly can cause sudden, repeatable shifts.
- Check for loose hardware on the drive system: Verify motor mounting screws, pulley fasteners, and any brackets that hold the belt/idler are snug. Vibration can loosen fasteners over time.
- Eliminate binding and resistance on the affected axis: With the printer idle, move the carriage by hand (where safe) and listen for scraping, sticking, or rough spots. Inspect cables for snag points and confirm the print head wiring can flex without tugging during motion.
- Confirm rails/bearings and leadscrew behavior: If you have linear rails, make sure carriages roll smoothly without side load. If you have a leadscrew (on Z for many machines), check for wobble and proper coupling—binding can force step skipping when the load increases.
- Address stepper-related causes if mechanics check out: If belts, pulleys, and motion feel smooth, look at driver overheating and electrical stability. Reseat connectors, check for damaged wiring to the steppers, ensure the printer’s cooling fans aren’t being overwhelmed, and verify that stepper-related settings (like steps per unit and firmware motion constraints) match what your printer actually uses.
Why this order matters: belt/pulley slip and loose set screws typically create instant jumps and happen on the same axis. Binding and resistance can cause step skipping especially as speeds/load change. Only after mechanical motion looks healthy should you focus on stepper electronics and settings.
Verify and fix belts, tension, and pulley slip
Belts and pulleys are a top cause of layer shifting because FDM relies on consistent belt motion and correct grip between the belt and pulleys.
What to do:
- Look for real grip issues: If you see missing belt teeth engagement, shiny wear spots, or a belt that’s not seated evenly on the pulley, repositioning and tension adjustment will often fix it.
- Set belt tension for “no slack, no strain”: A belt that’s too loose can slip under acceleration; one that’s too tight can add drag and make the axis harder to move.
- Check that pulleys can’t rotate freely on the shaft: Even with the belt tension right, a loose pulley on the motor shaft can slip. That’s why the set-screw step above is critical.
Quick sanity check after changes: run the printer’s normal motion (manually move the axis using the controls, or start a short move routine if your firmware supports it). The axis should move smoothly without clicking or stalling. Any roughness now can become a shift later under print load.
Tighten set screws and eliminate mechanical resistance
Loose set screws and binding issues don’t just ruin one print—they can gradually worsen shifts as wear increases.
Loose set screws (what to look for):
- The pulley hub doesn’t feel fully fixed to the shaft.
- The set screw is present but not actually gripping.
- Shifts happen at roughly similar heights or after a similar time-on-machine, suggesting repeatable slippage.
Mechanical resistance (what to look for):
- Scraping or uneven movement when moving the axis by hand.
- A cable tug that changes as the print head travels.
- Signs of misalignment: belt rubbing, carriages pulled off-center, or fasteners that slowly back out.
Fixes that usually help:
- Re-seat and firmly secure the pulleys to the motor shafts.
- Ensure cables have slack where they need it and don’t catch on frame parts.
- Clean and re-check mounting points (rails, brackets, motor mounts) for anything that can flex or wobble.
A practical tip: if you suspect binding, try to observe movement while the axis is moving quickly (as safely as possible). Binding often becomes obvious when speed increases.
Confirm with test prints and repeatability
Once you’ve made changes, don’t trust a single full print. You want evidence that the shift is truly gone—and that the printer behaves correctly under the same kind of motion that triggered it.
Use short, controlled test prints:
- A calibration/rectangular test that forces X and Y travel: Choose a simple geometry that repeatedly accelerates and reverses direction.
- Match the “trigger” conditions: If your original shift started around a certain height, try to reproduce similar travel patterns and load early on.
- Start with conservative settings: If the printer shifts at normal speed, lowering print speed temporarily can confirm the mechanism (too much mechanical slip/drag shows up sooner). Then raise speed gradually after stability improves.
What “fixed” looks like:
- The test print shows clean layer-to-layer alignment across the full height.
- You no longer hear step skipping artifacts (clicking or abrupt motion).
- If the printer previously shifted in a consistent direction, that behavior stops repeating.
If you still get shifts after belt/pulley/set-screw/binding checks, the next place to look is the motion-control side: reseat stepper connectors, verify driver cooling, and confirm motion settings in firmware (especially anything that affects acceleration/jerk behavior). At that point, the goal is to find whether the steppers are losing steps due to electrical or control limits rather than mechanical friction.
A solid next step: take one root-cause area at a time, apply the fix, and validate with a short print that stresses the same axis. This approach prevents chasing “symptoms” and helps you land on the real cause quickly.
PriceIt3D may earn a commission when you buy through links on this page, at no extra cost to you. Affiliate notice.